- Area
- Drawing concepts
- Classes:
A canvas you can draw on.

UiArea provide a canvas you can draw on. It also receives keyboard and mouse events, supports scrolling, is DPI aware, and has several other useful features.
var libui = require('.');
const colorDodgerBlue = 0x1E90FF;

const win = new libui.UiWindow('UiArea example', 640, 480, true);

// Helper to quickly set a brush color
function buildSolidBrush(color, alpha) {
	let component;

	component = (color >> 16) & 0xff;
	const R = component / 255;
	component = (color >> 8) & 0xff;
	const G = component / 255;
	component = color & 0xff;
	const B = component / 255;
	const A = alpha;

	const brush = new libui.DrawBrush();
	brush.color = new libui.Color(R, G, B, A);
	brush.type = libui.brushType.solid;

	return brush;
}

const widget = new libui.UiArea(
	function draw(area, p) {
		// fill the area with a dodger blue color rectangle
		const brush = buildSolidBrush(colorDodgerBlue, 1.0);
		const path = new libui.UiDrawPath(libui.fillMode.winding);
		path.addRectangle(0, 0, p.getAreaWidth(), p.getAreaHeight());
		path.end();
		p.getContext().fill(path, brush);
		path.freePath();
	},
	function mouseEvent() {},
	function mouseCrossed() {},
	function dragBroken() {},
	function keyEvent() {}
);

win.setChild(widget);

win.onClosing(function () {
	win.close();
	libui.stopLoop();
});

win.show();

libui.startLoop();A UiArea calls several methods to do certain tasks. To create an area, 5 function callbacks need to be passed:
new libui.UiArea(
    function draw(area, p) {},
    function mouseEvent(area, event) {},
    function mouseCrossed(area, didLeave) {},
    function dragBroken(area) {},
    function keyEvent(area, event) {}
);function draw(area, drawParams){}The actual drawing happens in this function. It gets called when the area was created or got resized with the area and UiAreaDrawParams as parameters.
function mouseEvent(area, event){ }Called when the mouse was moved or clicked over the area. event is an UiAreaMouseEvent.
function mouseCrossed(area, didLeave) { },Called when the mouse entered (didLeave == true) or left the area.
Called to indicate that a drag should be ended. Only implemented on Windows.
function keyEvent(area, keyEvent) {}Called when a key was pressed. Return true to indicate that the key event was handled (a menu item with that accelerator won't activate, no error sound on macOS). Event is an UiAreaKeyEvent.
Unlike drawing canvas controls in other toolkits, UiArea does not have a fixed size. The coordinate (0, 0) is always the top-left corner of the drawing area, regardless of how big the uiArea is in the current window or where the scrollbars presently are. Instead, you simulate a size by setting the scrollbar bounds, and you are given the current scrolling positions to base your drawing with.
The visible drawing area is called the content area by the drawing machinery.
When the UiArea needs to be redrawn, the area's draw() method is called.
In the traditional way we think of drawing, we think of rendering onto a plane of pixels. The pixels have a fixed size, and coordinates refer to the entire space that a pixel occupies.
When we say "draw a line from (0, 0) to (5, 5) exclusive", we mean "fill the spaces that are occupied by the pixels at (0, 0), (1, 1), (2, 2), (3, 3), and (4, 4)".
But now let's pretend we're working in a coordinate system where the point at (x, y) corresponds strictly to the top-left corner of the area that a pixel occupies.
In this model, when we say "draw a line from (0, 0) to (5, 5)", we mean "draw a straight line filling every pixel that we cross if we traced a line from the top-left corner of what we used to call the pixel at (0, 0 to the top-left corner of what we used to call the pixel at (5, 5)".
There are both technical and non-technical reasons for following this model. The technical reason is that implementing certain drawing operations, such as filling shapes, is much easier if we do things this way. The cairo FAQ explains in more detail. The non-technical reason has to do with DPI independence.
An upcoming trend in computing is the high-resolution display. These displays fit more dots in the same area that older screens could. The conventional term for the number of dots that fit in a given area is the "dots per inch", or DPI, measure.
A naive approach to writing programs for these new displays is to think "well, if I just take the DPI and only use it in calculations where I need to deal with real-world measurements such as inches, rendering pure pixels as I always have, I should be fine". This kind of design is centered around DPI awareness. I know, I used to believe this too. But here's a little secret: this is wrong! A common myth about high-resolution monitors among non-technical people is that it makes the stuff on screen smaller.
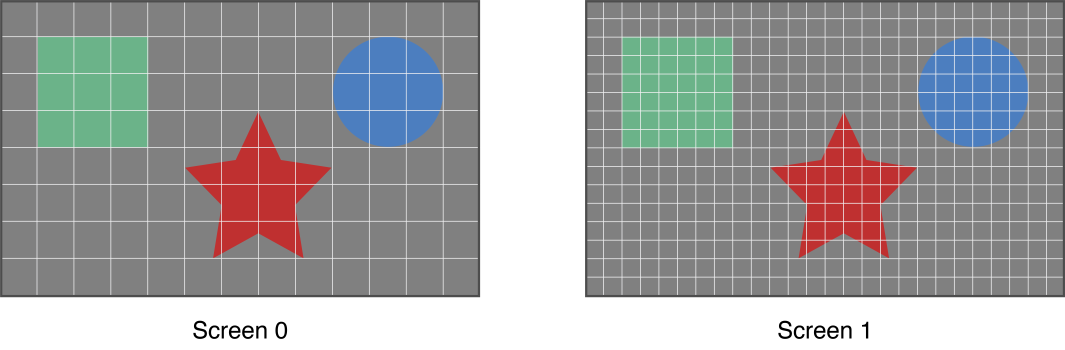
Instead, what we want out of a high-resolution display is to show a more detailed view of the same image in the same space. The first image on Apple's discussion of the topic is the perfect example. On the left, you see a low-resolution monitor. Notice how big chunks of the shapes go into the boxes. When the code that maps points to pixels runs, it can't have two colors in one square, so it has to decide what color to use.
class UiAreaDrawParams {
	context: UiDrawContext;

	contentWidth: Number;
	contentHeight: Number;

	hscrollpos: Number;
	vscrollpos: Number;

	clipX: Number;
	cilpY: Number;
	clipWidth: Number;
	clipHeight: Number;

	dpiX: Number;
	dpiY: Number;
};
context is the drawing context; see UiDrawContext for details.
contentWidth and contentHeight are the current width and height of the content area. hscrollpos and vscrollpos are the current horizontal and vertical positions of the scrollbars, in units defined by the scrollbar configurations; see below.
clipX, clipY, clipWidth, and clipHeight define a rectangle, in content area coordinates, that the OS has requested to be redrawn. You can use this to optimize your drawing by only drawing where drawing is needed; the OS may choose to drop any drawing done outside the clip rectangle.
dpiX and dpiY are the uiArea's current DPI in the X and Y directions, respectively. Do not save these values; they are not guaranteed to stay the same once draw() returns.
The UiDrawContext class is used for drawing rectangles, text, images and other objects onto the UiArea widget. It provides the 2D rendering context for the drawing surface of a UiArea widget.
To get an object of this interface, use the getContext method of the UiAreaDrawParams argument you receive in your draw method:
function draw(area, p) {
	var context = p.getContext();
}Draw a path in the context.
Arguments
- path: UiDrawPath - the path to use for the operation.
- brush: DrawBrush - the brush to use for the operation.
- params: DrawStrokeParams - define the kind of line to use.
Draw a path filled with a color.
Arguments
- path: UiDrawPath - the path to use for the operation.
- brush: DrawBrush - the brush to use for the operation.
Apply a different transform matrix to the context.
Arguments
- matrix: UiDrawMatrix - the matrix to apply.
Clip a path from the context
Arguments
- path: UiDrawPath - the path to use for the operation.
Save the trasformations currently applyed to the context.
Restore previously saved trasformations of the context.
Draws a given text at the given (x,y) position.
- x: Number - the horizontal position at which to draw the text.
- y: Number - the vertical position at which to draw the text.
- layout: DrawTextLayout (see AttributedString) - the text to draw, complete with font, width and alignment information.
Represent a path that could be drawed on a UiDrawContext
Arguments
- fillMode: UiDrawFillMode
An application fills the interior of a path using one of two fill modes: alternate or winding. The mode determines how to fill and clip the interior of a closed figure.
The default mode is Alternate (libui.fillMode.alternate). To determine the interiors of closed figures in the alternate mode, draw a line from any arbitrary start point in the path to some point obviously outside the path. If the line crosses an odd number of path segments, the starting point is inside the closed region and is therefore part of the fill or clipping area. An even number of crossings means that the point is not in an area to be filled or clipped. An open figure is filled or clipped by using a line to connect the last point to the first point of the figure.
The Winding mode (libui.fillMode.winding) considers the direction of the path segments at each intersection. It adds one for every clockwise intersection, and subtracts one for every counterclockwise intersection. If the result is nonzero, the point is considered inside the fill or clip area. A zero count means that the point lies outside the fill or clip area.
A figure is considered clockwise or counterclockwise based on the order in which the segments of the figure are drawn.
Dispose a path object.
Starts a new figure at the specified point. Call this method when you want to create a new path.
Arguments
- x: Number
- y: Number
Starts a new figure and adds an arc to the path which is centered at (xCenter, yCenter) position with radius radius starting at startAngle and with sweep angle sweep going in the given direction by anticlockwise (defaulting to clockwise) as specified by negative.
Arguments
- xCenter: Number
- yCenter: Number
- radius: Number
- startAngle: Number
- sweep: Number
- negative: Boolean
Connects the last point in the subpath to the x, y coordinates with a straight line.
Arguments
- x: Number
- y: Number
Adds an arc to the path which is centered at (xCenter, yCenter) position with radius radius starting at startAngle and with sweep angle sweep going in the given direction by anticlockwise (defaulting to clockwise) as specified by negative.
Arguments
- xCenter: Number
- yCenter: Number
- radius: Number
- startAngle: Number
- sweep: Number
- negative: Boolean
Adds a cubic Bézier curve to the path. It requires three points. The first two points are control points and the third one is the end point. The starting point is the last point in the current path.
Arguments
- c1x: Number
- c1y: Number
- c2x: Number
- c2y: Number
- endX: Number
- endY: Number
Creates a path for a rectangle at position (x, y) with a size that is determined by width and height.
Arguments
- x: Number
- y: Number
- width: Number
- height: Number
End the path leaving the figure open.
Causes the point of the pen to move back to the start of the current sub-path. It tries to draw a straight line from the current point to the start. If the shape has already been closed or has only one point, this function does nothing.
It end the path.
Defines the color(s) to draw a path with.
Free the DrawBrush object.
Sets and gets the brush type.
Arguments (set)
- type
libui.brushType.solidfor a solid colorlibui.brushType.linearGradientfor a linear gradientlibui.brushType.radialGradientfor a radial gradient
It's also possible to use the type property:
myBrush.type = libui.brushType.radialGradient;Sets and gets the brush's color (only used when type is libui.brushType.solid).
Arguments (set)
- color: Color
It's also possible to use the color property:
myBrush.color = new libui.Color(1, 0, 0, 1);Sets and gets the brush's gradient start position (only used when type is a gradient). For a radial gradient, this is the center.
Arguments (set)
- p: Point
It's also possible to use the start property:
myBrush.start = new libui.Point(200,100);Sets and gets the brush's gradient end position (only used when type is a gradient). For a radial gradient, this is the center of the outer circle.
Arguments (set)
- p: Point
It's also possible to use the end property:
myBrush.end = new libui.Point(300,200);Sets and gets the radius of a radial gradient's outer circle.
Arguments (set)
- p: Point
It's also possible to use the outerRadius property:
myBrush.outerRadius = new libui.Point(300,200);Sets and gets the radius of a radial gradient's outer circle.
Arguments (set)
- s: Array<BrushGradientStop>
It's also possible to use the stops property:
myBrush.stops = [
	new libui.BrushGradientStop(0, new libui.Color(1, 0, 0, 1)),
	new libui.BrushGradientStop(1, new libui.Color(0, 1, 0, 1))
];Represents a color value in a gradient.
This concept is best described with an example: A rectangle is drawn at (0,0) and has a width of 100 and a height of 50. It should be filled with a gradient which goes along the diagonal from the top left (red) to the bottom right corner (blue). This is achieved by creating a linear gradient brush and setting it's start and end points to the corresponding corners of the rectangle:
const linearBrush = new libui.DrawBrush();
linearBrush.type = libui.brushType.linearGradient;
linearBrush.start = new libui.Point(0, 0);
linearBrush.end = new libui.Point(100, 50);
A BrushGradientStop defines where on the line between the start and end point a color stops lies. pos = 0 corresponds to the start point and pos = 1 to the end point.
linearBrush.stops = [
	new libui.BrushGradientStop(0, new libui.Color(1, 0, 0, 1)),
	new libui.BrushGradientStop(1, new libui.Color(0, 0, 1, 1))
];
For radial gradients, pos = 0 corresponds to the center at the start point and pos = 1 to the circle with the radius outerRadius and the center end.
Arguments
- pos: number
- color: Color
Sets or gets the position of this stop.
Arguments (set)
- pos: number
It's also possible to use the pos property.
Sets or gets the position of this stop.
Arguments (set)
- color: color
It's also possible to use the color property.
Describes the stroke to draw with.
Frees the object.
Sets and gets the thickness of the stroke.
Arguments (set)
- thickness: number
It's also possible to use the thickness property:
myStroke.thickness = 10;Sets and gets the style of that cap at the line ends.
Arguments (set)
- style:
libui.lineCap.flat(default)libui.lineCap.roundlibui.lineCap.square
It's also possible to use the cap property:
myStroke.cap = libui.lineCap.round;Sets and gets how two lines meeting at an angle should be joined.
Arguments (set)
- style:
libui.lineJoin.miter(default)libui.lineJoin.roundlibui.lineJoin.bevel
It's also possible to use the join property:
myStroke.join = libui.lineJoin.round;Sets and gets how far to extend a line for the line join (more detailed description here).
Arguments (set)
- v: number
It's also possible to use the miterLimit property.
Sets and gets the dashing style. It is specified by an array of numbers describing how long the dash segments and spaces should be.
The value [10, 2, 5, 2] produces a dashed path with: a line of length 10, a space of 2, a line of length 5, a space. This pattern will be repeated to fill the path.
Arguments (set)
- v: Array<number>
It's also possible to use the dashes property:
myStroke.dashes = [10, 5];Sets and gets the offset to of the dashes on the path. Changing this value moves the dashes along the path.
Arguments (set)
- v: number
It's also possible to use the dashPhase property:
myStroke.dashPhase = 5;Defines a transformation (e.g. rotation, translation)
A matrix can be applied to a context using context.transform(myMatrix). Only object drawn after this call will be affected by the transformation.
Usage example:
// ...

const matrix = new libui.UiDrawMatrix();
matrix.setIdentity();
matrix.rotate(100, 100, 45/*deg*/ * (Math.PI/180));

p.getContext().transform(matrix);
p.getContext().fill(myPath, myBrush);

// ...Frees the object.
These methods can be used to set or get a specific value in the matrix:
getM11()/setM11()getM12()/setM12()getM21()/setM21()getM22()/setM22()getM31()/setM31()getM32()/setM32()
They can also be accessed using properties:
myMatrix.m11 = 2;Creating the matrix sets all of it's values to 0, which means nothing will get displayed when it is applied. After calling this method, applying the matrix has no visual sequence. This needs to be called before any of the following transformations are used.
Moves paths over by x to the right and y down.
Arguments
- x: number
- y: number
Scales pathes by a factor of x and y with (xCenter, yCenter) as the scale center.
Arguments
- xCenter: number
- yCenter: number
- x: number
- y: number
Rotates paths by r radians around (x,y).
Arguments
- x: number
- y: number
- r: number
Skews path by xAmount radians horizontally and by yAmount radians vertically around (x, y)
Arguments
- x: number
- y: number
- xAmount: number
- yAmount: number
Sets the matrix to the product of itself with matrix m2.
Arguments
- m2: UiDrawMatrix
Returns true if the matrix is invertible.
Inverts the matrix.
Returns the transformed point.
Arguments
- p: PointDouble
Returns the transformed size.
Arguments
- s: SizeDouble
class UiAreaMouseEvent {
	getX(): number,
	getY(): number,
	getAreaWidth(): number,
	getAreaHeight(): number,
	getDown(): number,
	getUp(): number,
	getCount(): number,
	getModifiers(): number,
	getHeld1To64(): number,
}
Most methods should be self-explanatory. For getModifiers() see UiAreaKeyEvent.
This event is emitted in three cases:
- When a mousebutton is pressed:
getDown()returns the pressed button.getCount()would return2on a double click,3on a triple click, ... . - When a mousebutton is released:
getUp()returns the released button. - When the mouse is moved:
getDown()andgetUp()return0. To find out which buttons were held down:
                       ┌ = 1: Button No. 2 is pressed
                       │
getHeld1To64(): 0b0000000
                      │ │
                      │ └ = 1: Button No. 1 is pressed (Primary/Left)
                      │
                      └─ = 1: Button No. 3 is pressed (Second./Right)
Example:
if(evt.getHeld1To64() & 4) { // 2^(3-1) is 4
	// right mouse button
}class UiAreaKeyEvent {
getKey(): string,
getExtKey(): number,
getModifier(): number,
getModifiers(): number,
getUp(): bool
}True if the key was released, false if it was pressed down.
Returns the letter (in a string) that was pressed (always using the US QWERTY layout). Returns an empty string if no letter button was pressed.
Returns the pressed extension key (0 if not). Values:
libui.extKeys.escapelibui.extKeys.insert(equivalent to "Help" on Apple keyboards)libui.extKeys.deletelibui.extKeys.homelibui.extKeys.endlibui.extKeys.pageUplibui.extKeys.pageDownlibui.extKeys.uplibui.extKeys.downlibui.extKeys.leftlibui.extKeys.right- function keys:
libui.extKeys.f1, ...,libui.extKeys.f12
- numpad keys: (independent of Num Lock state)
libui.extKeys.n0, ...,libui.extKeys.n9libui.extKeys.nDotlibui.extKeys.nEnterlibui.extKeys.nAddlibui.extKeys.nSubtractlibui.extKeys.nMultiplylibui.extKeys.nDivide
Returns the pressed modifier key (0 if not). Values:
libui.modifierKeys.ctrllibui.modifierKeys.altlibui.modifierKeys.shiftlibui.modifierKeys.super
Returns a number where each bit represents which modifier keys were held down while pressing another button (getKey() or getExtKey()).
Example: to test if the Ctrl Key was pressed:
if(evt.getModifiers() & libui.modifierKeys.ctrl){
	// ctrl was pressed
}Arguments
- x: number
- y: number
Arguments (set)
- x: number
Also accessible using p.x.
Arguments (set)
- y: number
Also accessible using p.y.
Arguments
- width: number
- height: number
Arguments (set)
- w: number
Also accessible using s.width.
Arguments (set)
- h: number
Also accessible using s.height.