Used in script code such as custom scripts, plug-in scripts, task scripts, platform extensions, template extensions, etc., that is, in code blocks like the following, you can use these module interfaces:
on_run(function (target)
    print("hello xmake!")
end)
!> In order to ensure that the description scope of the outer layer is as simple and secure as possible, it is generally not recommended to use the interface and module operation api in this domain. Therefore, most module interfaces can only be used in the script domain to implement complex functions.
Of course, a small number of read-only built-in interfaces can still be used in the description scope, as shown in the following table:
An example of using an interface call in a description scope is as follows, generally only for conditional control:
-- Scan all subdirectories under the current xmake.lua directory, defining a task task with the name of each directory
for _, taskname in ipairs(os.dirs("*"), path.basename) do
    task(taskname)
        on_run(function ()
        end)
end
The script scope and description scope mentioned above mainly refer to:
-- description scope
target("test")

    -- description scope
    set_kind("static")
    add_files("src/*.c")

    on_run(function (target)
        -- Script domain
    end)

-- description scopeImport is mainly used to import xmake's extension class library and some custom class library modules, generally used to:
- Custom script (on_build, on_run ..)
- Plugin development
- Template development
- Platform extension
- Custom task task
The import mechanism is as follows:
- Import from the current script directory first
- Import from the extended class library
Imported grammar rules:
Class library path rules based on ., for example:
Import core core extension module
import("core.base.option")
import("core.base.task")

function main()

    -- Get parameter options
    print(option.get("version"))

    -- Run tasks and plugins
    task.run("hello")
end
Import the custom module in the current directory:
Directory Structure:
Plugin
  - xmake.lua
  - main.lua
  - modules
    - hello1.lua
    - hello2.lua
Import modules in main.lua
import("modules.hello1")
import("modules.hello2")
After importing, you can directly use all the public interfaces inside. The private interface is marked with the _ prefix, indicating that it will not be exported and will not be called externally. .
In addition to the current directory, we can also import libraries in other specified directories, for example:
import("hello3", {rootdir = "/home/xxx/modules"})To prevent naming conflicts, you can also specify an alias after import:
import("core.platform.platform", {alias = "p"})

function main()

    -- So we can use p to call the plats interface of the platform module to get a list of all the platforms supported by xmake.
    utils.dump(p.plats())
end
Import can not only import the class library, but also import and import as inheritance, realize the inheritance relationship between modules.
import("xxx.xxx", {inherit = true})This is not a reference to the module, but all the public interfaces of the module imported, so that it will be merged with the interface of the current module to achieve inheritance between modules.
Version 2.1.5 adds two new properties: `import("xxx.xxx", {try = true, anonymous = true}).
If the try is true, the imported module does not exist, only return nil, and will not interrupt xmake after throwing an exception. If anonymous is true, the imported module will not introduce the current scope, only the imported object reference will be returned in the import interface.
Through import, we can import not only many built-in extension modules of xmake, but also user-defined extension modules.
Just put your own module in the project directory and import it according to the import method described above.
So, what if you want to define a module? xmake has a set of convention rules for module writing specifications, and does not follow Lua's native require import mechanism, and there is no need to use return in the module to return it globally.
If we have a module file foo.lua, its content is as follows:
function _foo(a, b)
    return a + b
end

function add(a, b)
    _foo(a, b)
end

function main(a, b)
    add(a, b)
end
Among them main is the entry function, optional, if set, the module foo can be called directly, for example:
import("foo")
foo(1, 2)
Or directly like this:
import("foo")(1, 2)Others without underscore are public module interface functions, such as add.
import("foo")
foo.add(1, 2)
The underscore prefixed _foo is a private function that is used internally by the module and is not exported, so users cannot call it outside.
This is equivalent to the inherit mode of the import interface, which is:
import("xxx.xxx", {inherit = true})With the inherit interface, it will be more concise:
Inherit("xxx.xxx")
For an example, see the script in the xmake tools directory: clang.lua
This is part of the clang tool module that inherits gcc.
Lua native does not provide try-catch syntax to catch exception handling, but provides interfaces such as pcall/xpcall to execute lua functions in protected mode.
Therefore, the capture mechanism of the try-catch block can be implemented by encapsulating these two interfaces.
We can look at the packaged try-catch usage first:
try
{
    -- try code block
    function ()
        error("error message")
    end,

    -- catch code block
    catch
    {
        -- After an exception occurs, it is executed
        function (errors)
            print(errors)
        end
    }
}
In the above code, an exception is thrown inside the try block, and an error message is thrown, caught in the catch, and the error message is output.
And finally processing, this role is for the try{} code block, regardless of whether the execution is successful, will be executed into the finally block
In other words, in fact, the above implementation, the complete support syntax is: try-catch-finally mode, where catch and finally are optional, according to their actual needs.
E.g:
try
{
    -- try code block
    function ()
        error("error message")
    end,

    -- catch code block
    catch
    {
        -- After an exception occurs, it is executed
        function (errors)
            print(errors)
        end
    },

    -- finally block
    finally
    {
        -- Finally will be executed here
        function (ok, errors)
            -- If there is an exception in try{}, ok is true, errors is the error message, otherwise it is false, and error is the return value in try
        end
    }
}
Or only the finally block:
try
{
    -- try code block
    function ()
        return "info"
    end,

    -- finally block
    finally
    {
        -- Since there is no exception in this try code, ok is true and errors is the return value: "info"
        function (ok, errors)
        end
    }
}
Processing can get the normal return value in try in finally, in fact, in the case of only try, you can also get the return value:
-- If no exception occurs, result is the return value: "xxxx", otherwise nil
local result = try
{
    function ()
        return "xxxx"
    end
}
In xmake's custom scripting and plugin development, it is also based entirely on this exception catching mechanism.
This makes the development of the extended script very succinct and readable, eliminating the cumbersome if err ~= nil then return value judgment. When an error occurs, xmake will directly throw an exception to interrupt, and then highlight the detailed error. information.
E.g:
target("test")
    set_kind("binary")
    add_files("src/*.c")

    -- After the ios program is compiled, the target program is ldid signed
    after_build(function (target))
        os.run("ldid -S %s", target:targetfile())
    end
Only one line os.run is needed, and there is no need to return a value to determine whether it runs successfully. After the operation fails, xmake will automatically throw an exception, interrupt the program and prompt the error.
If you want to run xmake without running interrupts directly after running, you can do it yourself.Add a try and you will be fine:
target("test")
    set_kind("binary")
    add_files("src/*.c")

    after_build(function (target))
        try
        {
            function ()
                os.run("ldid -S %s", target:targetfile())
            end
        }
    end
If you want to capture the error message, you can add a catch:
target("test")
    set_kind("binary")
    add_files("src/*.c")

    after_build(function (target))
        try
        {
            function ()
                os.run("ldid -S %s", target:targetfile())
            end,
            catch
            {
                function (errors)
                    print(errors)
                end
            }
        }
    end
However, in general, write custom scripts in xmake, do not need to manually add try-catch, directly call a variety of api, after the error, let xmake default handler to take over, directly interrupted. .
This is lua's native built-in api. In xmake, it has been extended in its original behavior to simplify some of the daily lua traversal code.
First look at the default native notation:
local t = {a = "a", b = "b", c = "c", d = "d", e = "e", f = "f"}

for key, val in pairs(t) do
    print("%s: %s", key, val)
end
This is sufficient for normal traversal operations, but if we get the uppercase for each of the elements it traverses, we can write:
for key, val in pairs(t, function (v) return v:upper() end) do
     print("%s: %s", key, val)
end
Even pass in some parameters to the second function, for example:
for key, val in pairs(t, function (v, a, b) return v:upper() .. a .. b end, "a", "b") do
     print("%s: %s", key, val)
endThis is lua's native built-in api. In xmake, it has been extended in its original behavior to simplify some of the daily lua traversal code.
First look at the default native notation:
for idx, val in ipairs({"a", "b", "c", "d", "e", "f"}) do
     print("%d %s", idx, val)
end
The extension is written like the pairs interface, for example:
for idx, val in ipairs({"a", "b", "c", "d", "e", "f"}, function (v) return v:upper() end) do
     print("%d %s", idx, val)
end

for idx, val in ipairs({"a", "b", "c", "d", "e", "f"}, function (v, a, b) return v:upper() .. a .. b end, "a", "b") do
     print("%d %s", idx, val)
end
This simplifies the logic of the for block code. For example, if I want to traverse the specified directory and get the file name, but not including the path, I can simplify the writing by this extension:
for _, filename in ipairs(os.dirs("*"), path.filename) do
    -- ...
endThis interface is also the native interface of lua. xmake is also extended based on the original behavior, and supports: formatted output, multivariable output.
First look at the way native support:
print("hello xmake!")
print("hello", "xmake!", 123)
And also supports extended formatting:
print("hello %s!", "xmake")
print("hello xmake! %d", 123)
Xmake will support both types of writing at the same time, and the internal will automatically detect and select the output behavior.
Like the print interface, the only difference is that it doesn't wrap.
The behavior is similar to print, the difference is that this interface also supports color terminal output, and supports emoji character output.
E.g:
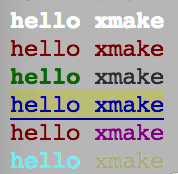
    cprint('${bright}hello xmake')
    cprint('${red}hello xmake')
    cprint('${bright green}hello ${clear}xmake')
    cprint('${blue onyellow underline}hello xmake${clear}')
    cprint('${red}hello ${magenta}xmake')
    cprint('${cyan}hello ${dim yellow}xmake')
The results are as follows:
The color-related descriptions are placed in ${ }, and you can set several different properties at the same time, for example:
${bright red underline onyellow}
Indicates: highlighted red, background yellow, and with a down line
All of these descriptions will affect the entire entire line of characters. If you only want to display partial color text, you can insert ${clear} at the end position to clear the previous color description.
E.g:
${red}hello ${clear}xmake
In this case, only hello is displayed in red, and the others are still normal black display.
Other colors belong to, I will not introduce them here, directly paste the list of attributes in the xmake code:
    colors.keys =
    {
        -- Attributes
        reset = 0 -- reset attribute
    , clear = 0 -- clear attribute
    , default = 0 -- default property
    , bright = 1 -- highlight
    , dim = 2 -- dark
    , underline = 4 -- underline
    , blink = 5 -- flashing
    , reverse = 7 -- reverse color
    , hidden = 8 -- hidden text

        -- Foreground
    , black = 30
    , red = 31
    , green = 32
    , yellow = 33
    , blue = 34
    , magenta = 35
    , cyan = 36
    , white = 37

        -- Background color
    , onblack = 40
    , onred = 41
    , ongreen = 42
    , onyellow = 43
    , onblue = 44
    , onmagenta = 45
    , oncyan = 46
    , onwhite = 47
In addition to color highlighting, if your terminal is under macosx, lion above the system, xmake can also support the display of emoji expressions, for systems that do not support Ignore the display, for example:
    cprint("hello xmake${beer}")
    cprint("hello${ok_hand} xmake")
The above two lines of code, I printed a classic beer symbol in the homebrew, the following line printed an ok gesture symbol, is not very dazzling. .
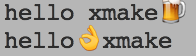
All emoji emoticons, as well as the corresponding keys in xmake, can be found in emoji. .
Version 2.1.7 supports 24-bit true color output, if the terminal supports it:
import("core.base.colors")
if colors.truecolor() then
    cprint("${255;0;0}hello")
    cprint("${on;255;0;0}hello${clear} xmake")
    cprint("${bright 255;0;0 underline}hello")
    cprint("${bright on;255;0;0 0;255;0}hello${clear} xmake")
end
Xmake's detection support for truecolor is implemented by the $COLORTERM environment variable. If your terminal supports truecolor, you can manually set this environment variable to tell xmake to enable truecolor support.
It can be enabled and tested with the following command:
$ export COLORTERM=truecolor
$ xmake --version
The 2.1.7 version can disable color output with COLORTERM=nocolor.
This interface is similar to cprint, the difference is that it does not wrap the output.
If you just want to format the string and don't output it, you can use this interface. This interface is equivalent to the string.format interface, just a simplified version of the interface name.
local s = format("hello %s", xmake)This interface is followed by [format](The #format) interface is similar, but adds support for the acquisition and escaping of built-in variables.
local s = vformat("hello %s $(mode) $(arch) $(env PATH)", xmake)If you want to interrupt xmake running in custom scripts and plug-in tasks, you can use this interface to throw an exception. If the upper layer does not show the call to try-catch, xmake will be executed. An error message is displayed.
if (errors) raise(errors)If an exception is thrown in the try block, the error information is captured in catch and finally. See: try-catch
The system operation module belongs to the built-in module. It can be called directly by the script scope without using import import.
This module is also a native module of lua, and xmake has been extended to provide more practical interfaces.
!> Only some readonly interfaces (for example: os.getenv, os.arch) in the os module can be used in the description scope. Other interfaces can only be used in the script domain, for example: os.cp, os .rmetc.
| Interface | Description | Supported Versions |
|---|---|---|
| os.cp | Copy files or directories | >= 2.0.1 |
| os.mv | Move Renamed File or Directory | >= 2.0.1 |
| os.rm | Delete files or directory tree | >= 2.0.1 |
| os.trycp | Try copying files or directories | >= 2.1.6 |
| os.trymv | Try moving the renamed file or directory | >= 2.1.6 |
| os.tryrm | Try deleting a file or directory tree | >= 2.1.6 |
| os.cd | Go to the specified directory | >= 2.0.1 |
| os.rmdir | Delete Directory Tree | >= 2.0.1 |
| os.mkdir | Create the specified directory | >= 2.0.1 |
| os.isdir | Determine if the directory exists | >= 2.0.1 |
| os.isfile | Determine if the file exists | >= 2.0.1 |
| os.exists | Determine if a file or directory exists | >= 2.0.1 |
| os.dirs | Traversing to get all directories under the specified directory | >= 2.0.1 |
| os.files | Traversing to get all the files in the specified directory | >= 2.0.1 |
| os.filedirs | Traversing to get all files or directories under the specified directory | >= 2.0.1 |
| os.exit | Exit the program | >= 2.3.1 |
| os.isexec | Test if a file is executable | >= 2.0.1 |
| os.run | Quiet running program | >= 2.0.1 |
| os.runv | Quiet running program with parameter list | >= 2.1.5 |
| os.exec | Evoke Run Program | >= 2.0.1 |
| os.execv | Echo running program with parameter list | >= 2.1.5 |
| os.iorun | Run and get the program output | >= 2.0.1 |
| os.iorunv | Run and get the program output with parameter list | >= 2.1.5 |
| os.tmpdir | Get Temp directory path | >= 2.0.1 |
| os.tmpfile | Get Temporary File Path | >= 2.0.1 |
| os.curdir | Get current directory path | >= 2.0.1 |
| os.filesize | Get File Size | >= 2.1.9 |
| os.scriptdir | Get script directory path | >= 2.0.1 |
| os.programdir | Get xmake install main program script directory | >= 2.1.5 |
| os.programfile | Get the path of the xmake executable | >= 2.1.5 |
| os.projectdir | Get Project Home | >= 2.1.5 |
| os.arch | Get Current System Architecture | >= 2.0.1 |
| os.host | Get Current Host System | >= 2.0.1 |
| os.subhost | Get Subsystem host, e.g. msys, cygwin on windows | >= 2.3.1 |
| os.subarch | Get Subsystem host architecture | >= 2.3.1 |
| os.is_host | Test if a given host is the current | >= 2.3.1 |
| os.is_arch | Test if a given arch is the current | >= 2.3.1 |
| os.is_subhost | Test if a given sub host is the current | >= 2.3.1 |
| os.is_subarch | Test if a given sub arch is the current | >= 2.3.1 |
| os.ln | Link file or directory to the new symfile | >= 2.2.2 |
| os.readlink | Read the content of a symlink | >= 2.2.2 |
| os.raise | Raise an exception and abort the current script | >= 2.2.8 |
| os.raiselevel | Raise an exception and abort the current script | >= 2.2.8 |
| os.features | Get features | >= 2.3.1 |
| os.getenvs | Get all current environment variables | >= 2.2.6 |
| os.setenvs | Set environment variables | >= 2.2.6 |
| os.addenvs | Add environment variables to current envs | >= 2.5.6 |
| os.joinenvs | Join environment variables | >= 2.5.6 |
| os.getenv | Get Environment Variables | >= 2.0.1 |
| os.setenv | Setting environment variables | >= 2.0.1 |
| os.addenv | Add values to one environment variable | >= 2.1.5 |
| os.setenvp | Setting environment variables with a given separator | >= 2.1.5 |
| os.addenvp | Add values to one environment variable with a given separator | >= 2.1.5 |
| os.workingdir | Get the working directory | >= 2.1.9 |
| os.isroot | Test if xmake is running as root | >= 2.1.9 |
| os.fscase | Test if the os has a case sensitive filesystem | >= 2.1.9 |
| os.term | Get current terminal | >= 2.7.3 |
| os.shell | Get current shell | >= 2.7.3 |
| os.cpuinfo | Get cpu information | >= 2.1.5 |
| os.meminfo | Get memory information | >= 2.1.5 |
| os.default_njob | Get default paralled jobs | >= 2.5.8 |
- Copy files or directories
The behavior is similar to the cp command in the shell, supporting path wildcard matching (using lua pattern matching), support for multi-file copying, and built-in variable support.
e.g:
os.cp("$(scriptdir)/*.h", "$(buildir)/inc")
os.cp("$(projectdir)/src/test/**.h", "$(buildir)/inc")
The above code will copy all the header files in the current xmake.lua directory, the header files in the project source test directory to the $(buildir) output directory.
Among them $(scriptdir), $(projectdir) These variables are built-in variables of xmake. For details, see the related documentation of [built-in variables](#built-in variables).
The matching patterns in *.h and **.h are similar to those in add_files, the former is a single-level directory matching, and the latter is a recursive multi-level directory matching.
This interface also supports `recursive replication' of directories, for example:
-- Recursively copy the current directory to a temporary directory
os.cp("$(curdir)/test/", "$(tmpdir)/test")
The copy at the top will expand and copy all files to the specified directory, and lose the source directory hierarchy. If you want to copy according to the directory structure that maintains it, you can set the rootdir parameter:
os.cp ("src/**.h", "/tmp/", {rootdir="src"})The above script can press the root directory of src to copy all sub-files under src in the same directory structure.
!> Try to use the os.cp interface instead of os.run("cp .."), which will ensure platform consistency and cross-platform build description.
Under 2.5.7, the parameter {symlink = true} is added to keep the symbolic link when copying files.
os.cp("/xxx/foo", "/xxx/bar", {symlink = true})- Move to rename a file or directory
Similar to the use of os.cp, it also supports multi-file move operations and pattern matching, for example:
-- Move multiple files to a temporary directory
os.mv("$(buildir)/test1", "$(tmpdir)")

-- File movement does not support bulk operations, which is file renaming
os.mv("$(buildir)/libtest.a", "$(buildir)/libdemo.a")- Delete files or directory trees
Support for recursive deletion of directories, bulk delete operations, and pattern matching and built-in variables, such as:
os.rm("$(buildir)/inc/**.h")
os.rm("$(buildir)/lib/")- Try copying files or directories
Similar to os.cp, the only difference is that this interface operation will not throw an exception interrupt xmake, but the return value indicates whether the execution is successful.
if os.trycp("file", "dest/file") then
end- Try moving a file or directory
Similar to os.mv, the only difference is that this interface operation will not throw an exception interrupt xmake, but the return value indicates whether the execution is successful.
if os.trymv("file", "dest/file") then
end- Try deleting files or directories
Similar to os.rm, the only difference is that this interface operation will not throw an exception interrupt xmake, but the return value indicates whether the execution is successful.
if os.tryrm("file") then
end- Enter the specified directory
This operation is used for directory switching and also supports built-in variables, but does not support pattern matching and multi-directory processing, for example:
-- Enter the temporary directory
os.cd("$(tmpdir)")
If you want to leave the previous directory, there are several ways:
-- Enter the parent directory
os.cd("..")

-- Enter the previous directory, equivalent to: cd -
os.cd("-")

-- Save the previous directory before entering the directory, then use it to cut back directly after the level
local oldir = os.cd("./src")
...
os.cd(oldir)- delete only the directory
If it is not a directory, it cannot be deleted.
- Create a directory
Support for batch creation and built-in variables, such as:
os.mkdir("$(tmpdir)/test", "$(buildir)/inc")- Determine if it is a directory
Return false if the directory does not exist
if os.isdir("src") then
    -- ...
end- Determine if it is a file
Return false if the file does not exist
if os.isfile("$(buildir)/libxxx.a") then
    -- ...
end- Determine if a file or directory exists
Return false if the file or directory does not exist
-- Judging the existence of the directory
if os.exists("$(buildir)") then
    -- ...
end

-- Judging the existence of the file
if os.exists("$(buildir)/libxxx.a") then
    -- ...
end- Traverse to get all the directories under the specified directory
Supports pattern matching in add_files, supports recursive and non-recursive mode traversal, and returns a table array. If not, returns an empty array, for example:
-- Recursive traversal to get all subdirectories
for _, dir in ipairs(os.dirs("$(buildir)/inc/**")) do
    print(dir)
end- Traverse to get all the files in the specified directory
Supports pattern matching in add_files, supports recursive and non-recursive mode traversal, and returns a table array. If not, returns an empty array, for example:
-- Non-recursive traversal to get all child files
for _, filepath in ipairs(os.files("$(buildir)/inc/*.h")) do
    print(filepath)
end- Traverse to get all files and directories under the specified directory
Supports pattern matching in add_files, supports recursive and non-recursive mode traversal, and returns a table array. If not, returns an empty array, for example:
-- Recursive traversal to get all child files and directories
for _, filedir in ipairs(os.filedirs("$(buildir)/**")) do
    print(filedir)
end- Exit the program
- Test if a file is executable
if os.isexec("path/to/file.exe") then
    os.run("path/to/file.exe")
end- Quietly running native shell commands
Used to execute third-party shell commands, but will not echo the output, only after the error, highlight the error message.
This interface supports parameter formatting and built-in variables such as:
-- Formatted parameters passed in
os.run("echo hello %s!", "xmake")

-- List build directory files
os.run("ls -l $(buildir)")
Using this interface to execute shell commands can easily reduce the cross-platform build. For `os.run("cp ..")`, try to use `os.cp` instead.
If you must use this interface to run the shell program, please use the [config.plat](#config-plat) interface to determine the platform support.
For more advanced process operations and control, see the process module interface.
- Quietly running native shell commands with parameter list
Similar to os.run, just the way to pass parameters is passed through the parameter list, not the string command, for example:
os.runv("echo", {"hello", "xmake!"})- Echo running native shell commands
Similar to the os.run interface, the only difference is that when this interface executes the shell program, it has the output output, which is used in general debugging.
- Echo running native shell commands with parameter list
Similar to os.exec, just the way to pass parameters is passed through the parameter list, not the string command, for example:
os.execv("echo", {"hello", "xmake!"})In addition, this interface also supports an optional parameter for passing settings: redirect output, perform environment variable settings, for example:
os.execv("echo", {"hello", "xmake!"}, {stdout = outfile, stderr = errfile, envs = {PATH = "xxx;xx", CFLAGS = "xx"}}Among them, the stdout and stderr parameters are used to pass redirected output and error output. You can directly pass in the file path or the file object opened by io.open.
After v2.5.1, we also support setting the stdin parameter to support redirecting input files.
!> stdout/stderr/stdin can simultaneously support three types of values: file path, file object, and pipe object.
In addition, if you want to temporarily set and rewrite some environment variables during this execution, you can pass the envs parameter. The environment variable settings inside will replace the existing settings, but will not affect the outer execution environment, only the current command.
We can also get all the current environment variables through the os.getenvs() interface, and then pass in the envs parameter after rewriting some parts.
- Quietly running native shell commands and getting output
Similar to the os.run interface, the only difference is that after executing the shell program, this interface will get the execution result of the shell program, which is equivalent to redirecting the output.
You can get the contents of stdout, stderr at the same time, for example:
local outdata, errdata = os.iorun("echo hello xmake!")- Run the native shell command quietly and get the output with a list of parameters
Similar to os.iorun, just the way to pass arguments is passed through the argument list, not the string command, for example:
local outdata, errdata = os.iorunv("echo", {"hello", "xmake!"})
local outdata, errdata = os.iorunv("echo", {"hello", "xmake!"}, {envs = {PATH="..."}})- Get temporary directory
Consistent with the result of $(tmpdir), it is just a direct return to return a variable that can be maintained with subsequent strings.
print(path.join(os.tmpdir(), "file.txt"))Equivalent to:
print("$(tmpdir)/file.txt")- Get temporary file path
Used to get a temporary file path, just a path, the file needs to be created by itself.
- Get the current directory path
Consistent with the result of $(curdir), it is just a direct return to return a variable that can be maintained with subsequent strings.
Usage reference: os.tmpdir.
- Get file size
print(os.filesize("/tmp/a"))- Get the path of the current description script
Consistent with the result of $(scriptdir), it is just a direct return to return a variable that can be maintained with subsequent strings.
Usage reference: os.tmpdir.
- Get the xmake installation main program script directory
Consistent with the result of $(programdir), it is just a direct get returned to a variable, which can be maintained with subsequent strings.
- Get the path of the xmake executable
- Get the project home directory
Consistent with the result of $(projectdir), it is just a direct return to return a variable that can be maintained with subsequent strings.
- Get current system architecture
That is the default architecture of the current host system, for example, I execute xmake on linux x86_64 to build, then the return value is: x86_64
- Get the operating system of the current host
Consistent with the result of $(host), for example, if I execute xmake on linux x86_64 to build, the return value is: linux
- Get Subsystem host, e.g. msys, cygwin on windows
- Get Subsystem host architecture
- Test if a given host is the current
- Test if a given arch is the current
- Test if a given sub host is the current
- Test if a given sub arch is the current
- Create a symlink to a file or directory
-- creates a symlink file "xxx.txt.ln" which is pointing to "xxx.txt"
os.ln("xxx.txt", "xxx.txt.ln")- Read the content of a symlink
- Raise an exception and abort the current script
-- Raise exception with message "an error occurred"
os.raise("an error occurred")
!> recommanded to use builtin function raise instead of os.raise
- Similar to os.raise but you can specify the level of the error
-- Raise exception with message "an error occurred"
os.raiselevel(3,"an error occurred")- Get features
- Get all current environment variables
local envs = os.getenvs()
--- home directory (on linux)
print(envs["HOME"])- Set environment variables. Replace the current envs by a new one and return old envs
- Add environment variables to current envs, return the all old envs
os.setenvs({EXAMPLE = "a/path"}) -- add a custom variable to see addenvs impact on it

local oldenvs = os.addenvs({EXAMPLE = "some/path/"})
print(os.getenvs()["EXAMPLE"]) --got some/path/;a/path
print(oldenvs["EXAMPLE"]) -- got a/path- Join environment variables. Similar to os.addenvs but with two envs variable
local envs = {CUSTOM = "a/path"}
local envs2 = {CUSTOM = "some/path/"}
print(os.joinenvs(envs, envs2))
The result is: { CUSTOM = "a/path;some/path/" }
- Get system environment variables
print(os.getenv("PATH"))- Set system environment variables
os.setenv("HOME", "/tmp/")- Add values to one environment variable
-- Add 'bin' to PATH
os.addenv("PATH", "bin")- Setting environment variables with a given separator
- Add values to one environment variable with a given separator
- Get the working directory
- Test if xmake is running as root
- Test if the os has a case sensitive filesystem
- Get current terminal (windows-terminal, vscode, ... )
print(os.term())
-- got vscode- Get current shell (pwsh, cmd, ...)
print(os.shell())
-- got pwsh- Get cpu information
print(os.cpuinfo())
-- got {
--   ncpu = 8,
--   usagerate = 0.0,
--   model_name = "Intel(R) Core(TM) i7-7700 CPU @ 3.60GHz",
--   march = "Kaby Lake",
--   vendor = "GenuineIntel",
--   model = 158,
--   family = 6
-- }
print(os.cpuinfo("march")) -- got "Kaby Lake"- Get memory information
print(os.meminfo())
-- got {
--   usagerate = 0.53490080822924,
--   totalsize = 16332,
--   availsize = 7596,
--   pagesize = 4096
-- }- Get default paralled jobs
The windows system operation module is a built-in module, no need to use import to import, you can directly call its interface in the script domain.
| Interface | Description | Support version |
|---|---|---|
| winos.version | Get windows system version | >= 2.3.1 |
| winos.registry_keys | Get the list of registry keys | >= 2.5.1 |
| winos.registry_values | Get a list of registry value names | >= 2.5.1 |
| winos.registry_query | Get the registry value | >= 2.3.1 |
- Get windows system version
The version returned is the semver semantic version object
if winos.version():ge("win7") then
    - ...
end

if winos.version():ge("6.1") then
    - ...
end
In addition, it can also support the direct judgment of the windows version name. The mapping rules are as follows:
nt4 = "4.0"
win2k = "5.0"
winxp = "5.1"
ws03 = "5.2"
win6 = "6.0"
vista = "6.0"
ws08 = "6.0"
longhorn = "6.0"
win7 = "6.1"
win8 = "6.2"
winblue = "6.3"
win81 = "6.3"
win10 = "10.0"
- Get the list of registry builds
Support through pattern matching, traverse to obtain the registry key path list, * is single-level path matching, ** is recursive path matching.
local keypaths = winos.registry_keys("HKEY_LOCAL_MACHINE\\SOFTWARE\\*\\Windows NT\\*\\CurrentVersion\\AeDebug")
for _, keypath in ipairs(keypaths) do
    print(winos.registry_query(keypath .. ";Debugger"))
end- Get a list of registry value names
Support to obtain the value name list of the specified key path through pattern matching, and the string after the ; is the specified key name pattern matching string.
local valuepaths = winos.registry_values("HKEY_LOCAL_MACHINE\\SOFTWARE\\xx\\AeDebug;Debug*")
for _, valuepath in ipairs(valuepaths) do
    print(winos.registry_query(valuepath))
end- Get the registry value
Get the value under the specified registry path, if the value name is not specified, then get the default value of the key path
local value, errors = winos.registry_query("HKEY_LOCAL_MACHINE\\SOFTWARE\\Microsoft\\Windows NT\\CurrentVersion\\AeDebug")
local value, errors = winos.registry_query("HKEY_LOCAL_MACHINE\\SOFTWARE\\Microsoft\\Windows NT\\CurrentVersion\\AeDebug;Debugger")The macOS system operation module is a built-in module, no need to use import to import, you can directly call its interface in the script domain.
| Interface | Description | Support version |
|---|---|---|
| macos.version | Get macOS system version | >= 2.3.1 |
- Get macOS system version
The version returned is the semver semantic version object
if macos.version():ge("10.0") then
    - ...
endThe linux system operation module is a built-in module, no need to use import to import, and its interface can be called directly in the script domain.
| Interface | Description | Support version | | ----------------------------------------------- |- ------------------------------------------- | ------ - | | linuxos.name | Get the linux system release name | >= 2.5.2 | | linuxos.version | Get linux system version | >= 2.5.2 | | linuxos.kernelver | Get linux system kernel version | >= 2.5.2 |
- Get linux system name
We can also quickly get the view through the following command
xmake l linuxos.nameSome names currently supported are:
- ubuntu
- debian
- archlinux
- manjaro
- linuxmint
- centos
- fedora
- opensuse
- Get linux system version
The version returned is the semver semantic version object
if linux.version():ge("10.0") then
    -- ...
end- Get linux system kernel version
What is returned is also a semantic version object, you can also execute xmake l linuxos.kernelver to quickly view
The io operation module extends lua's built-in io module to provide more easy-to-use interfaces.
| Interface | Description | Supported Versions |
|---|---|---|
| io.open | Open file for reading and writing | >= 2.0.1 |
| io.load | De-serialize all table contents from the specified path file | >= 2.0.1 |
| io.save | Serialize all table contents to the specified path file | >= 2.0.1 |
| io.readfile | Read everything from the specified path file | >= 2.1.3 |
| io.writefile | Write everything to the specified path file | >= 2.1.3 |
| io.gsub | Full text replaces the contents of the specified path file | >= 2.0.1 |
| io.tail | Read and display the tail of the file | >= 2.0.1 |
| io.cat | Read and display all contents of a file | >= 2.0.1 |
| io.print | Formatting output with a line feed to a file | >= 2.0.1 |
| io.printf | No line formatted output to file | >= 2.0.1 |
| io.lines | Read all lines from file | >= 2.2.9 |
| io.stdfile | Get std file | >= 2.2.9 |
| io.openlock | Open a lock of a file | >= 2.2.9 |
| io.replace | Replace text of the given file and return the replaced data | >= 2.3.8 |
- Open file for reading and writing
This is a native interface for lua. For detailed usage, see Lua's official documentation: The Complete I/O Model
If you want to read all the contents of the file, you can write:
local file = io.open("$(tmpdir)/file.txt", "r")
if file then
    local data = file:read("*all")
    file:close()
end
Or you can read it more quickly using io.readfile.
If you want to write a file, you can do this:
-- Open file: w is write mode, a is append write mode
local file = io.open("xxx.txt", "w")
if file then

    -- Write data to file with native lua interface, does not support formatting, no line breaks, does not support built-in variables
    file:write("hello xmake\n")

    -- Write data to file with xmake extended interface, support formatting, no line breaks, no built-in variables
    file:writef("hello %s\n", "xmake")

    -- Use xmake extended formatted parameters to write to one line, with line breaks, and support for built-in variables
    file:print("hello %s and $(buildir)", "xmake")

    -- Write a line using the xmake extended formatted arguments, no line breaks, and support for built-in variables
    file:printf("hello %s and $(buildir) \n", "xmake")

    -- Close the file
    file:close()
end- Load all table contents from the specified path file deserialization
You can load serialized table contents from a file, generally used with io.save, for example:
-- Load the contents of the serialized file to the table
local data = io.load("xxx.txt")
if data then

    -- Dump prints the contents of the entire table in the terminal, formatting the output
    utils.dump(data)
end- Serialize all table contents to the specified path file
You can serialize the contents of the table to the specified file, generally used in conjunction with io.load, for example:
io.save("xxx.txt", {a = "a", b = "b", c = "c"})The result of the storage is:
{
    ["b"] = "b"
,   ["a"] = "a"
,   ["c"] = "c"
}
- Read everything from the specified path file
It is more convenient to directly read the contents of the entire file without opening the file, for example:
local data = io.readfile("xxx.txt")- Write all content to the specified path file
It is more convenient to directly write the contents of the entire file without opening the file, for example:
io.writefile("xxx.txt", "all data")- Full text replaces the contents of the specified path file
Similar to the string.gsub interface, the full-text pattern matches the replacement content, but here is the direct operation file, for example:
-- Remove all whitespace characters from the file
io.gsub("xxx.txt", "%s+", "")- Read and display the tail content of the file
Reads the data of the specified number of lines at the end of the file and displays a command like cat xxx.txt | tail -n 10, for example:
-- Display the last 10 lines of the file
io.tail("xxx.txt", 10)- read and display all contents of the file
Read all the contents of the file and display it, similar to the cat xxx.txt command, for example:
io.cat("xxx.txt")- Formatted output content to file with newline
Directly format the passed parameter to output a line of string to the file with a line break, for example:
io.print("xxx.txt", "hello %s!", "xmake")- Formatted output to file without line breaks
Directly format the passed parameter to output a line of string to the file without a line break, for example:
io.printf("xxx.txt", "hello %s!\n", "xmake")- Read all lines from file
Returns all lines from a given file name
local lines = io.lines("xxx.txt")
for line in lines do
    print(line)
end- Get a std file
Returns a file for a given std file name
-- returns stdin
io.stdin
-- returns stdout
io.stdout
-- returns stderr
io.stderr- Open a lock of a file
Returns a file lock object when successfully locking the file
local lock = io.openlock("xxx.txt")
lock:lock()
lock:unlock()
lock:close()- Replace text of the given file and return the replaced data
Replaces a given pattern in a file by a replacement string
-- replace string "Hello" in "xxx.txt" with "World"
io.replace("xxx.txt", "Hello", "World")
-- if you want to replace a string and not a pattern
io.replace("xxx.txt", "1+1=2", "2+2=4", {plain = true})The path operation module implements cross-platform path operations, which is a custom module of xmake.
| Interface | Description | Supported Versions |
|---|---|---|
| path.new | Create a new path instance | >= 2.0.1 |
| path.join | Stitching Path | >= 2.0.1 |
| path.translate | Convert path to the path style of the current platform | >= 2.0.1 |
| path.basename | Get the file name with no suffix at the end | >= 2.0.1 |
| path.filename | Get the file name with the last suffix of the path | >= 2.0.1 |
| path.extension | Get the suffix of the path | >= 2.0.1 |
| path.directory | Get the directory name of the path | >= 2.0.1 |
| path.relative | Convert to relative path | >= 2.0.1 |
| path.absolute | Convert to absolute path | >= 2.0.1 |
| path.is_absolute | Determine if it is an absolute path | >= 2.0.1 |
| path.split | Split by the separator | >= 2.0.1 |
| path.sep | Get the separator character | >= 2.0.1 |
| path.islastsep | Get if the last character is a separator | >= 2.0.1 |
| path.splitenv | Split a environment variable value of an array of pathes | >= 2.2.7 |
| path.joinenv | Concat environment variable with environment separator | >= 2.2.7 |
| path.envsep | Get the path seperator of environment variable | >= 2.2.7 |
| path.cygwin_path | Get the converted MSYS2/Cygwin style path | >= 2.2.7 |
| path.pattern | Convert a path pattern to a lua pattern | >= 2.2.7 |
- Create a new path instance
local p = path.new("/tmp/file.txt")
print(p:filename())
The result is: file.txt
- Stitching path
Adding multiple path items by splicing. Due to the path difference of windows/unix style, using api to append paths is more cross-platform, for example:
print(path.join("$(tmpdir)", "dir1", "dir2", "file.txt"))The above splicing on Unix is equivalent to: $(tmpdir)/dir1/dir2/file.txt, and on Windows is equivalent to: $(tmpdir)\\dir1\\dir2\\file.txt
If you find this cumbersome and not clear enough, you can use: path.translate to format the conversion path string to the format supported by the current platform.
- Convert path to the path style of the current platform
Formatting converts the specified path string to the path style supported by the current platform, and supports the path string parameter of the windows/unix format to be passed in, even mixed, such as:
print(path.translate("$(tmpdir)/dir/file.txt"))
print(path.translate("$(tmpdir)\\dir\\file.txt"))
print(path.translate("$(tmpdir)\\dir/dir2//file.txt"))
The path strings of the above three different formats, after being standardized by translate, will become the format supported by the current platform, and the redundant path separator will be removed.
- Get the file name with no suffix at the end of the path
print(path.basename("$(tmpdir)/dir/file.txt"))The result is: file
- Get the file name with the last suffix of the path
print(path.filename("$(tmpdir)/dir/file.txt"))The result is: file.txt
- Get the suffix of the path
print(path.extensione("$(tmpdir)/dir/file.txt"))The result is: .txt
- Get the directory name of the path
Print(path.directory("$(tmpdir)/dir/file.txt"))The result is: $(tmpdir)/dir
- Convert to relative path
print(path.relative("$(tmpdir)/dir/file.txt", "$(tmpdir)"))The result is: dir/file.txt
The second parameter is to specify the relative root directory. If not specified, the default is relative to the current directory:
os.cd("$(tmpdir)")
print(path.relative("$(tmpdir)/dir/file.txt"))
The result is the same.
- Convert to absolute path
print(path.absolute("dir/file.txt", "$(tmpdir)"))The result is: $(tmpdir)/dir/file.txt
The second parameter is to specify the relative root directory. If not specified, the default is relative to the current directory:
os.cd("$(tmpdir)")
print(path.absolute("dir/file.txt"))
The result is the same.
- Determine if it is an absolute path
if path.is_absolute("/tmp/file.txt") then
    -- if it is an absolute path
end- Split the path by the separator
print(path.split("/tmp/file.txt"))The result is: { "tmp", "file.txt" }
- Return the current separator, usually
/
print(path.sep("/tmp/file.txt"))The result is: /
- Get if the last character is a separator
if (path.islastsep("/tmp/dir/")) then
    -- if the last character is a separator
end- Split a environment variable value of an array of pathes
local pathes = path.splitenv(vformat("$(env PATH)"))

-- for windows
local pathes = path.splitenv("C:\\Windows;C:\\Windows\\System32")
-- got { "C:\\Windows", "C:\\Windows\\System32" }

-- for *nix
local pathes = path.splitenv("/usr/bin:/usr/local/bin")
-- got { "/usr/bin", "/usr/local/bin" }
The result is an array of strings, each item is a path in the input string.
- Concat two environment variable by the environment separator
print(path.joinenv({"/tmp/dir", "/tmp/dir2"}))The result is: /tmp/dir;/tmp/dir2 (on Windows)
- Get the environment separator
print(path.envsep())The result is: ;
- Get the converted MSYS2/Cygwin style path
print(path.cygwin_path("C:\\Windows"))The result is: /C/Windows
- Convert path pattern to lua pattern
print(path.pattern("/tmp/file.txt"))The result is: /[tT][mM][pP]/[fF][iI][lL][eE]%.[tT][xX][tT]
Table belongs to the module provided by Lua native. For the native interface, you can refer to: lua official document
It has been extended in xmake to add some extension interfaces:
| Interface | Description | Supported Versions |
|---|---|---|
| table.join | Merge multiple tables and return | >= 2.0.1 |
| table.join2 | Merge multiple tables into the first table | >= 2.0.1 |
| table.unique | Deduplicate the contents of the table | >= 2.0.1 |
| table.slice | Get the slice of the table | >= 2.0.1 |
- Merge multiple tables and return
You can merge the elements in multiple tables and return to a new table, for example:
local newtable = table.join({1, 2, 3}, {4, 5, 6}, {7, 8, 9})The result is: {1, 2, 3, 4, 5, 6, 7, 8, 9}
And it also supports the merging of dictionaries:
local newtable = table.join({a = "a", b = "b"}, {c = "c"}, {d = "d"})The result is: {a = "a", b = "b", c = "c", d = "d"}
- Combine multiple tables into the first table
Similar to table.join, the only difference is that the result of the merge is placed in the first argument, for example:
local t = {0, 9}
table.join2(t, {1, 2, 3})
The result is: t = {0, 9, 1, 2, 3}
- Deduplicate the contents of the table
To de-table elements, generally used in array tables, for example:
local newtable = table.unique({1, 1, 2, 3, 4, 4, 5})The result is: {1, 2, 3, 4, 5}
- Get the slice of the table
Used to extract some elements of an array table, for example:
-- Extract all elements after the 4th element, resulting in: {4, 5, 6, 7, 8, 9}
table.slice({1, 2, 3, 4, 5, 6, 7, 8, 9}, 4)

-- Extract the 4th-8th element and the result: {4, 5, 6, 7, 8}
table.slice({1, 2, 3, 4, 5, 6, 7, 8, 9}, 4, 8)

-- Extract the 4th-8th element with an interval of 2, resulting in: {4, 6, 8}
table.slice({1, 2, 3, 4, 5, 6, 7, 8, 9}, 4, 8, 2)- Determine that the table contains the specified value
if table.contains(t, 1, 2, 3) then
     - ...
end
As long as the table contains any value from 1, 2, 3, it returns true
- Get an ordered list of keys
The order of the key list returned by table.keys(t) is random. If you want to get an ordered key list, you can use this interface.
The string module is a native module of lua. For details, see: lua official manual
It has been extended in xmake to add some extension interfaces:
| Interface | Description | Supported Versions |
|---|---|---|
| string.startswith | Determine if the beginning of the string matches | >= 1.0.1 |
| string.endswith | Determine if the end of the string matches | >= 1.0.1 |
| string.split | Split String | >= 1.0.1 |
| string.trim | Remove the left and right whitespace characters | >= 1.0.1 |
| string.ltrim | Remove the whitespace character to the left of the string | >= 1.0.1 |
| string.rtrim | Remove the whitespace character to the right of the string | >= 1.0.1 |
- Determine if the beginning of the string matches
local s = "hello xmake"
if s:startswith("hello") then
    print("match")
end- Determine if the end of the string matches
local s = "hello xmake"
if s:endswith("xmake") then
    print("match")
endpattern match and ignore empty string
("1\n\n2\n3"):split('\n') => 1, 2, 3
("abc123123xyz123abc"):split('123') => abc, xyz, abc
("abc123123xyz123abc"):split('[123]+') => abc, xyz, abc
plain match and ignore empty string
("1\n\n2\n3"):split('\n', {plain = true}) => 1, 2, 3
("abc123123xyz123abc"):split('123', {plain = true}) => abc, xyz, abc
pattern match and contains empty string
("1\n\n2\n3"):split('\n', {strict = true}) => 1, , 2, 3
("abc123123xyz123abc"):split('123', {strict = true}) => abc, , xyz, abc
("abc123123xyz123abc"):split('[123]+', {strict = true}) => abc, xyz, abc
plain match and contains empty string
("1\n\n2\n3"):split('\n', {plain = true, strict = true}) => 1, , 2, 3
("abc123123xyz123abc"):split('123', {plain = true, strict = true}) => abc, , xyz, abc
limit split count
("1\n\n2\n3"):split('\n', {limit = 2}) => 1, 2\n3
("1.2.3.4.5"):split('%.', {limit = 3}) => 1, 2, 3.4.5- Remove the left and right whitespace characters of the string
string.trim(" hello xmake! ")The result is: "hello xmake!"
- Remove the whitespace character to the left of the string
string.ltrim(" hello xmake! ")The result is: "hello xmake! "
- Remove the whitespace character to the right of the string
string.rtrim(" hello xmake! ")The result is: " hello xmake!"
The coroutine module is a native module of lua. For use, see: lua official manual
2.9.1 adds a new signal registration interface. We can register signal processing functions such as SIGINT in the Lua layer to customize the response logic.
- Register signal handler
Currently, it only supports SIGINT signal processing, and it also supports mainstream platforms such as windows.
import("core.base.signal")

function main()
     signal.register(signal.SIGINT, function (signo)
         print("signal.SIGINT(%d)", signo)
     end)
     io.read()
end
This is useful when some sub-processes internally shield SIGINT, causing them to freeze and not exit. Even if the user presses Ctrl+C to exit the xmake process, it does not exit.
We can force it out in this way.
import("core.base.process")
import("core.base.signal")

function main()
     local proc
     signal.register(signal.SIGINT, function (signo)
         print("sigint")
         if proc then
             proc:kill()
         end
     end)
     proc = process.open("./trap.sh")
     if proc then
         proc:wait()
         proc:close()
     end
end
For the background of this issue, please refer to: #4889
- Ignore a signal
We can also ignore the processing of blocking a certain signal through the signal.ignore interface.
signal.ignore(signal.SIGINT)- Reset a signal
We can also clear the processing function of a certain signal and fall back to the default processing logic.
signal.reset(signal.SIGINT)