Bresser 5-in-1/6-in-1 868 MHz Weather Sensor Radio Receiver based on ESP32 and RFM95W/SX1276 - sends data to a LoRaWAN Network (e.g. The Things Network)
The RFM95W/SX1276 radio transceiver is used in FSK mode to receive weather sensor data and in LoRaWAN mode to connect to a LoRaWAN Network.
- Single 868 MHz Radio Transceiver for both Sensor Data Reception and LoRaWAN Connection
- Tested with The Things Network and Helium Network (EU868)
- Supports multiple 868 MHz Sensors (e.g. Weather Sensor and Soil Moisture Sensor or Indoor Thermometer/Hygrometer)
- Low Power Design (using ESP32 Deep Sleep Mode)
- Fast LoRaWAN Joining after Deep Sleep (using ESP32 RTC RAM)
- ATC MiThermometer Bluetooth Low Energy Thermometer/Hygrometer Integration (optional)
- OneWire Temperature Sensor Integration (optional)
- ESP32 Analog Digital Converter Integration (optional)
- Please see my LoRaWAN_Node project.
- LILYGO® TTGO LORA32 (deep-sleep current measurement wanted!)
- Presumably Adafruit Feather ESP32 with Adafruit LoRa Radio FeatherWing should work (confirmation/configuration files welcome)
DFRobot FireBeetle ESP32 IoT (DFR0478) recomended due to its good low power design (but other boards will work, too)
- Adafruit RFM95W LoRa Radio Transceiver Breakout (ADA3072) - 868/915 MHz version (868 MHz is used for both LoRaWAN and Bresser Weather Sensor in Europe)
- RF connector (u.FL or SMA as desired)
- Antenna (Delock 89769 - LoRa 868 MHz Antenna SMA plug 3 dBi omnidirectional has been used with good results)
Mains adapter or Li-Ion battery (with or without solar charger) - depending on desired operation time and duty cycle.
-
Install the Arduino ESP32 board package (V1.0.6 or V2.0.X) in the Arduino IDE (V1.8.19) -
Note: When using the ESP32 board package >=V2.0.5, you have to apply two fixes in arduino-lorawan and arduino-lmic, respectively (see below) -
Select the desired ESP32 board
-
Install all libraries as listed in the section Library Dependencies via the Arduino IDE Library Manager
-
Configure
Arduino/libraries/MCCI_LoRaWAN_LMIC_library/project_config/lmic_project_config.h:- select you appropriate region
#define CFG_sx1276_radio 1
-
Add the following line to
Arduino/libraries/MCCI_LoRaWAN_LMIC_library/project_config/lmic_project_config.h:#define LMIC_ENABLE_DeviceTimeReq 1(Otherwise requesting the time from the LoRaWAN network will not work, even if supported by the network.)
-
Apply fixes if using ESP32 board package >= v2.0.5
-
Download and unpack the desired BresserWeatherSensorTTN release (Releases)
-
Load the sketch
BresserWeatherSensorTTN.inofrom the unpacked BresserWeatherSensorTTN archive directory -
Compile
| Library | r: required / o: optional |
|---|---|
| MCCI Arduino Development Kit ADK | r |
| MCCI LoRaWAN LMIC library | r |
| MCCI Arduino LoRaWAN Library | r |
| RadioLib | r |
| LoRa_Serialization | r |
| ESP32Time | r |
| BresserWeatherSensorReceiver | r |
| ESP32AnalogRead | o |
| OneWireNg | o |
| DallasTemperature | o |
| NimBLE-Arduino + ATC_MiThermometer | o |
See dependencies for required/tested versions.
- First you have to follow your LoRaWAN Network provider's instructions on how to configure/obtain the settings.
- Then configure the BresserWeatherSensorTTN software accordingly:
- Solution 1 (not recommended):
Configure the section starting with
// APPEUI, DEVEUI and APPKEYin BresserWeatherSensorTTN.ino - Solution 2 (recommended):
Configure the file secrets.h - refer to secrets.h.template as an example --
#define SECRETS

// deveui, little-endian
static const std::uint8_t deveui[] = { 0xAA, 0xBB, 0xCC, 0x00, 0x00, 0xDD, 0xEE, 0xFF };

// appeui, little-endian
static const std::uint8_t appeui[] = { 0x00, 0x00, 0x00, 0x00, 0x00, 0x00, 0x00, 0x00 };

// appkey: just a string of bytes, sometimes referred to as "big endian".
static const std::uint8_t appkey[] = { 0x11, 0x22, 0x33, 0x44, 0x55, 0x66, 0x77, 0x88, 0x99, 0xAA, 0xBB, 0xCC, 0xDD, 0xEE, 0xFF, 0x00 };
- Solution 1 (not recommended):
Configure the section starting with
See Adafruit RFM69HCW and RFM9X LoRa Packet Radio Breakouts - Pinouts.
Note: If you are using the same RF transceiver for sensor data reception and LoRaWAN connection, you must change the pin definitions in two places!
-
LoRaWAN Software Part
Change the default configuration in BresserWeatherSensorTTN.ino:
#define PIN_LMIC_NSS      14
#define PIN_LMIC_RST      12
#define PIN_LMIC_DIO0     4
#define PIN_LMIC_DIO1     16
#define PIN_LMIC_DIO2     17
Note: For LILYGO TTGO LoRa32 V1, the correct pin configuration will be set with the board selection in the Arduino IDE.
-
BresserWeatherSensorReceiver Software Part
Change the default configuration in the directory Arduino/libraries/BresserWeatherSensorReceiver/src/WeatherSensorCfg.h!!!
Changing BresserWeatherSensorTTN/WeatherSensorCfg.h will have no effect!
#define PIN_RECEIVER_CS   14

// CC1101: GDO0 / RFM95W/SX127x: G0
#define PIN_RECEIVER_IRQ  4

// CC1101: GDO2 / RFM95W/SX127x: G1
#define PIN_RECEIVER_GPIO 16

// RFM95W/SX127x - GPIOxx / CC1101 - RADIOLIB_NC
#define PIN_RECEIVER_RST  12
The board specific default SPI pin definitions (MISO, MOSI and SCK) can be found in https://github.com/espressif/arduino-esp32/tree/master/variants
To configure other SPI pins than the default ones... is up to you. I.e. better use the default pins unless you have a really good reason not to do so and then only if you know what you're doing!
In BresserWeatherSensorTTNCfg.h:
- Select the desired LoRaWAN network by (un)-commenting
ARDUINO_LMIC_CFG_NETWORK_TTNorARDUINO_LMIC_CFG_NETWORK_GENERIC - Disable features which you do not want to use
- Configure the timing parameters (if you think this is needed)
- If enabled, configure your ATC MiThermometer's BLE MAC Addressby by editing
knownBLEAddresses - Configure your time zone by editing
TZ_INFO - Configure the ADC's input pins, dividers and oversampling settings as needed
In BresserWeatherSensorTTN.ino, change the code starting with
//
// Encode sensor data as byte array for LoRaWAN transmission
//
LoraEncoder encoder(loraData);
Make sure that you do not exceed the size of the LoRaWAN uplink payload buffer loraData[PAYLOAD_SIZE]. The payload size is limited to 51 bytes by the LMIC library (for a good reason).
If you are using an Integration at the network side (such as an MQTT Integration), make sure you adjust your changes there as well - otherwise decoding the receiving/decoding the messages will fail.
See Debug Output Configuration in Arduino IDE
| Command | Cmd | Unit | Data0 | Data1 | Data2 | Data3 |
|---|---|---|---|---|---|---|
| CMD_SET_WEATHERSENSOR_TIMEOUT | 0xA0 | seconds | timeout[7:0] | |||
| CMD_SET_SLEEP_INTERVAL | 0xA8 | seconds | interval[15: 8] | interval[ 7: 0] | ||
| CMD_SET_SLEEP_INTERVAL_LONG | 0xA9 | seconds | interval[15: 8] | interval[ 7: 0] | ||
| CMD_RESET_RAINGAUGE | 0xB0 | |||||
| CMD_SET_DATETIME | 0x88 | epoch | unixtime[31:24] | unixtime[23:16] | unixtime[15:8] | unixtime[7:0] |
- Convert interval to hex: 360 = 0x0168
- Build command sequence: "CMD_SET_SLEEP_INTERVAL 360 secs" -> 0xA8 0x01 0x68
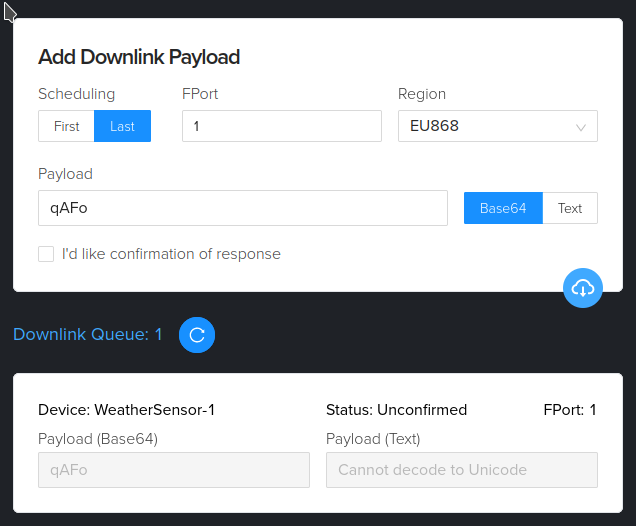
- Convert command sequence to Base64 encoding: 0xA8 0x01 0x68 -> "qAFo" (Base64 Guru)
- Send command sequence e.g. via Helium Console

- Get epoch (e.g. from https://www.epochconverter.com/hex) (Example: 0x63B2BC32); add an offset (estimated) for time until received (Example: + 64 / 0x40 seconds => 0x63B2BC72)
- Build command sequence: "CMD_SET_DATETIME 0x63B2BC72" -> 0x88 0x63 0xB2 0xBC 0x72
- Convert command sequence to Base64 encoding: 0x88 0x63 0xB2 0xBC 0x72 -> "iGOyvHI="
- Send command sequence e.g. via Helium Console
Decode payload (a sequence of bytes) into data structures which are readable/suitable for further processing: paste ttn_decoder_fp.js as "Custom Javascript formatter" to "Payload Formatters" -> "Uplink" on The Things Network Console.
Note: The actual payload depends on the options selected in the Arduino software - the decoder must be edited accordingly (add or remove data types and JSON identifiers - see ttn_decoder_fp.js line 176ff).
TTN provides an MQTT broker. How to receive and decode the payload with an MQTT client - see https://www.thethingsnetwork.org/forum/t/some-clarity-on-mqtt-topics/44226/2
V3 topic:
v3/<ttn app id><at symbol>ttn/devices/<ttn device id>/up
v3 message key field jsonpaths:
<ttn device id> = .end_device_ids.device_id
<ttn app id> = .end_device_ids.application_ids.application_id  // (not including the <at symbol>ttn in the topic)
<payload> = .uplink_message.frm_payload
JSON-Path with Uplink-Decoder (see ttn_decoder_fp.js)
.uplink_message.decoded_payload.bytes.<variable>
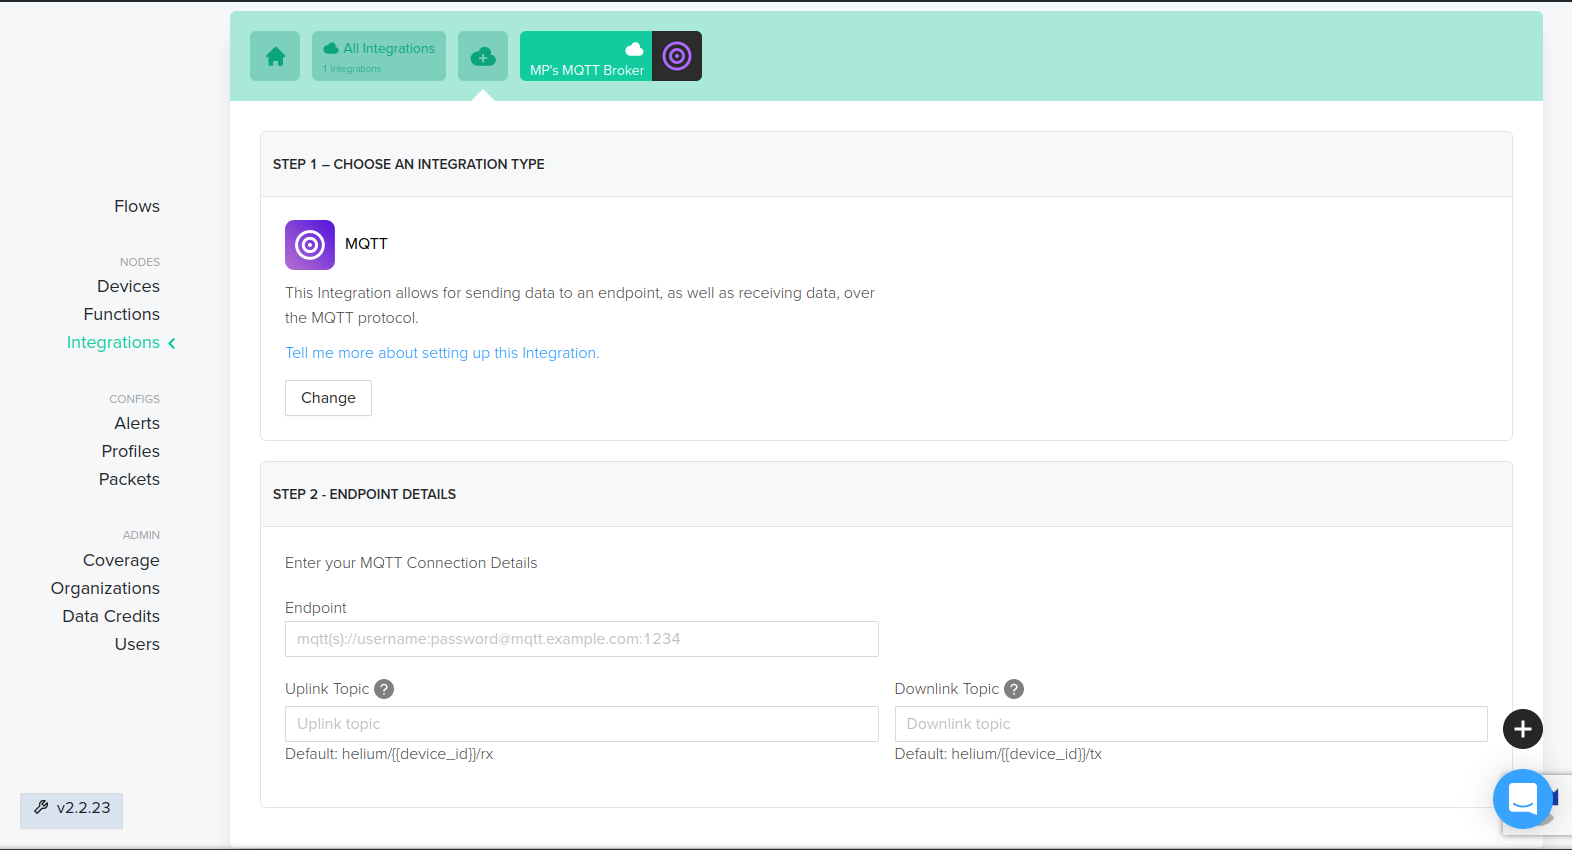
Please refer to https://docs.helium.com/use-the-network/console/integrations/mqtt/.
Add an MQTT integration in the Helium console - the "Endpoint" is in fact an MQTT broker you have to provide:

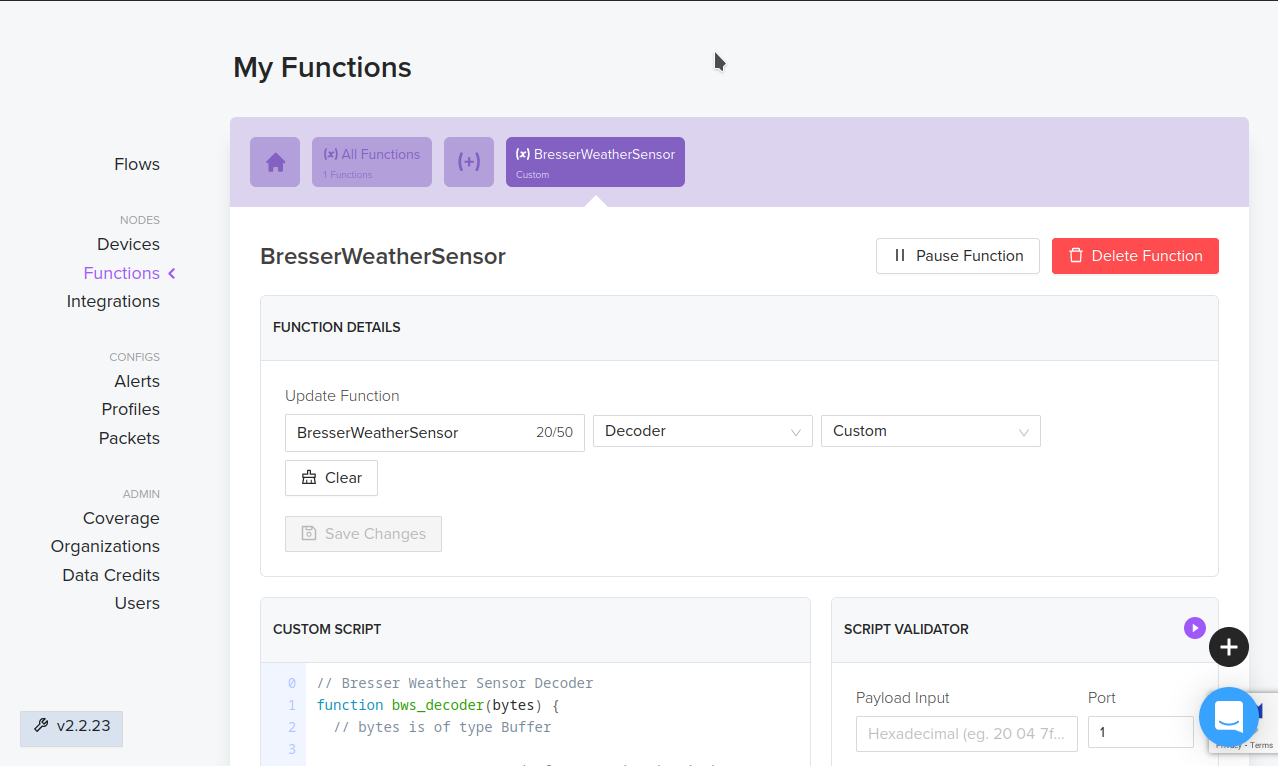
Add helium_decoder.js in the Helium console as custom function:

Note: The actual payload depends on the options selected in the Arduino software - the decoder must be edited accordingly (add or remove data types and JSON identifiers).
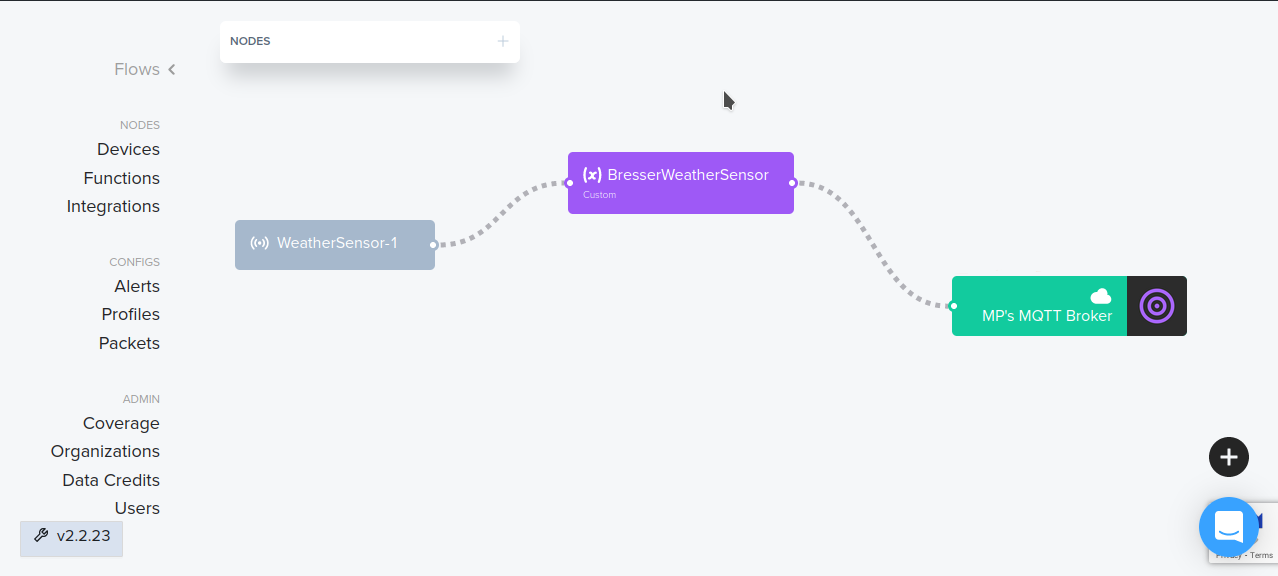
Add your function to the flow:

Example decoder output (JSON):
rx = {[...],"decoded":{"payload":{"air_temp_c":"13.5","battery_v":4197,"humidity":72,"indoor_humidity":53,"indoor_temp_c":"21.7","rain_day":"0.0","rain_hr":"0.0","rain_mm":"480.8","rain_mon":"0.0","rain_week":"0.0","soil_moisture":0,"soil_temp_c":"-30.0",
"status":{"ble_ok":true,"res":false,"rtc_sync_req":true,"runtime_expired":true,"s1_batt_ok":false,"s1_dec_ok":false,"ws_batt_ok":true,"ws_dec_ok":true},
"supply_v":4210,"water_temp_c":"-30.0","wind_avg_meter_sec":"1.9","wind_direction_deg":"282.0","wind_gust_meter_sec":"2.0"},
"status":"success"}, [...]
https://matthias-bs.github.io/BresserWeatherSensorTTN/index.html
Based on
- BresserWeatherSensorReceiver by Matthias Prinke
- RadioLib by Jan Gromeš
- MCCI LoRaWAN LMIC library by Thomas Telkamp and Matthijs Kooijman / Terry Moore, MCCI
- MCCI Arduino LoRaWAN Library by Terry Moore, MCCI
- Lora-Serialization by Joscha Feth
- ESP32Time by Felix Biego
- ESP32AnalogRead by Kevin Harrington (madhephaestus)
- OneWireNg by Piotr Stolarz
- DallasTemperature / Arduino-Temperature-Control-Library by Miles Burton
- NimBLE-Arduino by h2zero

