The Denver Dev Day organization committee was using an event-hosting website for 3 years before the company behind it was sold and their community license was revoked. Because the event is organized by the community, there was no budget to pay for the commercial license, so organizers decided to move on to use free services for the event.
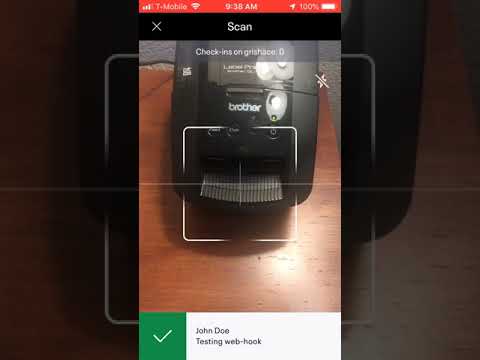
However, there was one feature missing. Printing the attendee's badge right away -automagically- after scanning the attendee's ticket adds a professional touch and streamlines the check-in process.
The purpose of this project is to fill that gap.
- COM-interop to use b-PAC SDK
- Generate QR code
- Invoke EventBrite API
- Subscribe to Azure message queue
- Brother QL-700 Label Printer
- Brother DK-1202 Labels
- Brother b-PAC SDK
- Brother P-touch Label Designer
- EventBrite account
- Azure account
- Unfortunately b-PAC SDK doesn't work with 64-bit .NET Core (or at least I didn't find how to make it work), but 32-bit version works perfectly.
.NET Core 3.0 is supposed to bring COM interop to the .NET Core world, but the path described here didn't work either, but b-PAC COM reference is there in the project file (just commented out) for you to try.COM interop assembly works after migrating project to the .NET 6.0dotnet build
- Log into your Azure subscription.
- Create Service Bus Namespace and a message queue.
- Deploy Logic App using
eb-integration.logicapp.json. Azure portal doesn't save connection information in the action block, therefore create a Send Message action using the service bus and selection the message queue from the drop-down list. - Add
Contentparameter, set it to dynamic content, start typingapi_urlin the search box, but select it from the found items below. Don't forget to save your logic app!
- Log into your EventBrite account and go to the Account Settings.
- Create WebHook for
barcode.checked_inaction. Use URL of the Logic App you've just deployed. - Press
Testbutton.
- Create a new app registration under App Management.
- Copy your personal OAuth token into
print-server.jsonEventBriteAccessTokenparameter.
- Copy queue connection string into the
ServiceBusQueueparameter. - Design your badge with the P-touch editor and save it into the
./assets/templates/folder.


dotnet run --no-build- Or
dotnet publishnavigate to the publish folder and runprint-server.exe