-
Notifications
You must be signed in to change notification settings - Fork 27
Installation
You will need VIPM (VI Package Manager), which is made freely available by JKI. If you don't already have VIPM installed, you can get it from here. VIPM must be version 2.0 or greater.
Installing VI Tester takes less than a minute. Here are the steps:
- Update your package list
- Install VI Tester
- Restart LabVIEW
From VIPM's toolbar, press the Check the Network for Available Packages button. VIPM will connect to the Internet and obtain an updated list of all the available packages.
After VIPM completes this operation, you may see a dialog stating that there were new packages found and asking you if you want to install them. Press the no/cancel button and proceed to the next step.
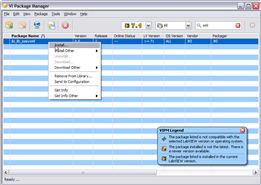
Find the jki_labs_tool_vi_tester package in the package list (hint: type "tester" into the quick search text box to find the VI Tester package). Right-click on it and select the Install right-click menu option, as shown below:
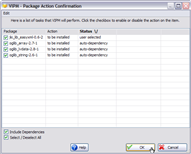
VIPM may ask you if you wish to install other dependency packages, in addition to jki_labs_tool_vi_tester. Make sure that all the dependency packages remain selected and press OK, as shown below.
VIPM will download all required packages and begin the installation process.
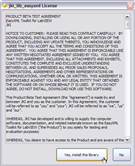
During the installation process, VIPM will present you with a license agreement dialog (shown below) for VI Tester software. If you agree to the terms of the license agreement, press the "Yes" button to proceed with the installation process.
After the installation process completes, restart LabVIEW. You are now ready to start using VI Tester.
VI Tester is an open source project maintained by the VIPM Community. To submit bugs, feature requests, or contributions, please submit an issue to the project tracker.


