TallyAccounts Software
TallyAccounts, an integral part of the Voucher Automation Software Suite, is a powerful application developed using Python and integrated with MongoDB Atlas. This innovative software optimizes financial management by efficiently processing approved vouchers and initiating payments while ensuring strict adherence to a streamlined workflow.
*NOTE: You have to be connected to the internet for this application to work.
Key Features of TallyAccounts
-
Payment Authorization: TallyAccounts enforces payment authorization by requiring the upload of the payee's signature before initiating any payment. This additional layer of security ensures that payments are made only to authorized recipients, minimizing potential errors or unauthorized transactions.
-
Voucher Integration with Tally ERP 9: Once the voucher status is set to "paid" in TallyAccounts, the approved voucher data can be seamlessly integrated into Tally ERP 9 using TallyMain. This integration ensures real-time updates in the accounting system, maintaining accurate and up-to-date financial records.
-
Voucher Selection Criteria: TallyAccounts intelligently filters vouchers based on their approval status, processing only those vouchers that have been approved by TallyMain. This helps maintain a clear separation between approved and pending vouchers, streamlining the payment process and avoiding any confusion.
-
Automated Payment Processing: With a focus on efficiency, TallyAccounts automatically initiates payments for the selected vouchers. Whether it's online fund transfers, generating checks, or recording cash payments in Tally ERP 9, the app handles the payment process seamlessly.
-
Status Tracking: The software provides comprehensive tracking of payment statuses, ensuring complete visibility into the payment workflow. This allows users to monitor the progress of payments and manage financial obligations effectively.
TallyAccounts streamlines the payment processing for approved vouchers, safeguarding against unauthorized payments and ensuring accurate financial transactions. By effectively integrating with Tally ERP 9 through TallyMain, the software ensures a seamless flow of financial data, supporting businesses in maintaining a robust and efficient accounting system.
You can get all the files for the project by cloning the project repository.
git clone https://github.com/jaypunekar/TallyAccounts.gitGo to the project directory
cd TallyAccountsYou will get all the files in AutoVoucherTally directory.
Step 1: There are two files that contains the code we are concerned with. i.e. main.py and util.py. In both the files you will find a section right after imports where the code to connect to MongoDB database is there.
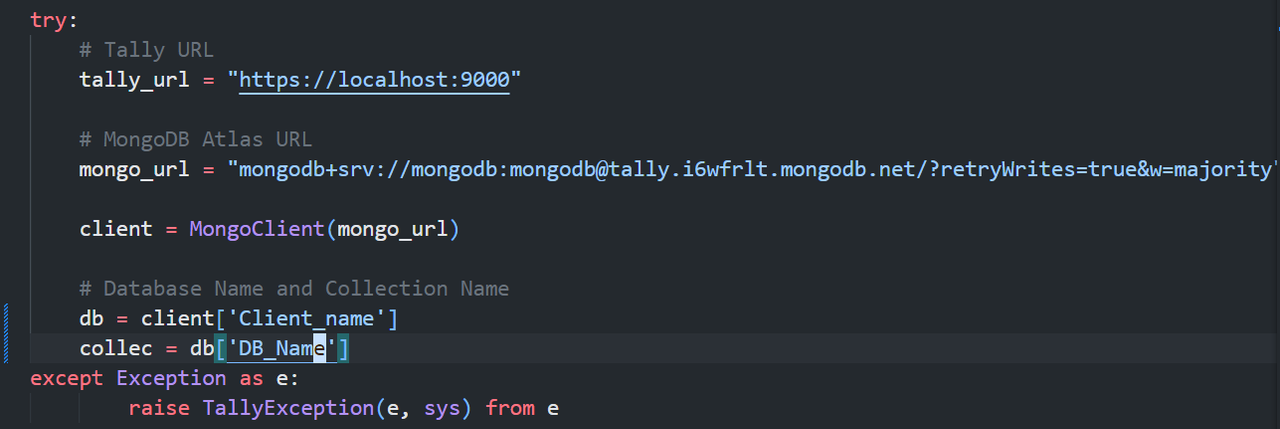
Setep 2: Change the mongo_url to the url you got earlier while setting up MongoDB Atlas. And change the database name and collection name as well (You should have all of it if you have followed the MongoDB Atlas Setup section). Change the code in both (main.py & util.py) the files.
*NOTE:- Keep localhost as it is.
You should have already run first two command if you followed TallyAccounts Setup
Clone the project:
git clone https://github.com/jaypunekar/TallyAccounts.gitGo to the project directory
cd TallyAccountsCreate conda virtual enviornment (This step in not necessory. Also, it requires Anaconda to be installed on your machine):
conda create -p venv python==3.8 -yconda activate venv/OR
conda activate venvInstall dependencies:
pip install -r requirements.txtTo run the program using Terminal:
python main.pyOR
python3 main.pyNOTE:- "Add Signature" button is not implemented yet. I am researching about some interesting ways to implement it.
In the Terminal (In TallyAccounts dir) run:
pyinstaller --onefile main.py Then run:
pyinstaller --name TallyAccounts --onefile --windowed --main.pyIf you want to add an icon run (icon.ico should be in TallyAccounts dir):
pyinstaller --name TallyAccounts --onefile --windowed --icon=icon.ico --main.py
